Take the Worry Out of installation
Find answers to common questions here.
Take the Worry Out of installation
Find answers to common questions here.
Installation FAQ
Answers to commonly asked questions about installing our products
Recommended usage and acceptable levels of traffic for floors will vary depending on the exact tile line, size, and finish. Detailed recommendations for each tile product we manufacture is available in the Recommended Applications (Usage Chart) found here.
Yes, we have detailed installation instructions for all our product available online. Refer to the www.installogt.com for a complete list of available pdf documents and installation videos
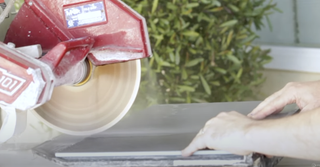
Measure the length and width of your space in inches. Then, multiply these two numbers together to get the area in square inches. Finally, to convert to square feet, divide this number by 144.
No, please refer to the current Installation Instructions and refer to the “Thin-Set” section.
No! There are specific thin sets that we recommend for installing Oceanside Glass & Tile. Please see the appropriate Installation Instructions and refer to the “Thin-Set” section.
In most cases, sanded grout is totally acceptable to use with our tile products. However, detailed information regarding grout selection can be found in our “Grout Selection Guide”. This includes details on when and where you can use other types of grouts including un-sanded, urethane and acrylic grouts (aka pre-mixed).
Grout color is extremely subjective and can be influenced by a number of site factors including lighting and surrounding finish colors. Therefore, we strongly suggest reviewing a grout chart against the installed tile with your designer or installer prior to making your final selection.
Glass tile itself is impervious and does not need to be sealed. However, any natural stone tile components and/or cement-based grout should be sealed to help prevent staining and prolong product life. Check out our General Maintenance Guide for additional information and product recommendations.
We recommend using Oceancare line of cleaning and maintenance products. Please reference our General Maintenance Guide for more specific instructions depending on application.
In many cases, yes but it will depend on the exact product line and tile size. Please see the “Recommended Applications Chart” and our “Pool & Water Feature Installation” document. Please note: Tiles with any edge longer than 5” or trim tile with any edge longer than 2.5” are not recommended for use in pools and water features.
Please see the Pool Tile Maintenance Guide for detailed information on pool tile and water chemistry maintenance.
NO! Please see the Pool Tile Maintenance Guide for detailed information on pool tile and water chemistry maintenance.
While all of the tile products we recommend for use in pools are impervious and freeze/thaw resistant it is still critical to protect the tile installation materials and substrate from the potential of freezing damage. Generally speaking, this requires preventing the water from freezing (heating and circulating) or lowering the water level to allow the tile installation materials and substrate to completely dry prior to the first freeze. For specific recommendations, we suggest reviewing the Association of Pool & Spa Professionals’ Winterizing a Pool fact sheet.
Please see the “Substrate Build Up” document with detailed instructions on a few different methods to achieve a flush installation.
No. Installing translucent tile over a membrane can cause a situation where moisture becomes trapped between the tile and the membrane. If this happens, it’s possible that the trapped moisture could darken the setting material, which will be visible through the tile as “spots” that never dry out. Translucent tile should be installed over an absorptive substrate. If this is not possible, it may be necessary to use an alternate, non-absorptive tile adhesive to install the tile instead of thin-set.
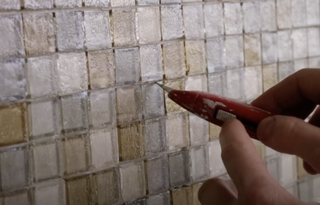
Check out our step-by-step tutorial video How Top Cut Paper-Faced Mosaics.
Check out our step-by-step tutorial video Cutting Film-Faced Mosaics.
Yes! Check out our video tutorial on Paper-Faced Mosaics Installation.
No, it’s really not. Installing paper-faced mosaics only requires a few extra steps during the installation process and a little attention to detail. Check out our How to Install Paper-Faced Mosaics video for a full step-by-step breakdown of the process.
Tile Terms/ Glossary
Below are some common terms used in the tile industry and their definitions.
A slow cooling process which relieves the thermal stress that naturally builds in glass production. After forming is complete, glass is gradually brought down to its specific annealing temperature range and held while internal temperatures equalize. After that pause, the glass is again slowly brought down to its specific strain point and finally, all the way to room temperature. Annealing takes time but it plays a crucial role in ensuring the material's structural integrity for increased durability, thermal shock, and frost resistance.
Glass fired to a molten state and then poured into a shape or mold.
A type of glass tile that features a three-dimensional surface design, adding depth and texture to various surfaces. These tiles are distinct from flat glass tiles due to their raised or recessed patterns, which create visual interest.
A glass tile produced through a specialized manufacturing process that involves pressing the glass material into a two-part mold to enhance its properties and achieve smoother edges.
An individual tile that is handset in place. (Not a pre-mounted Mosaic sheet.)
A process where a thin, transparent film is applied to the front (face) of tiles to hold them in place and protect their surfaces during handling and installation. Once the tiles are set and dried into the adhesive, the film is removed
Grout is a vital construction material used to fill the joints between tiles, providing structural stability, water resistance, and aesthetic enhancement. Available in different types such as cementitious, epoxy, and urethane, grout is essential for both residential and commercial tiling projects. Proper installation and maintenance are crucial for the longevity and appearance of the tiled surface. Please refer to our installation guidelines for recommended installation materials including grout.
Our hand-cut tiles are made from sheets of our beautiful art glass that have been scored with a glass cutter then carefully snapped into the desired pieces.
A liner is a long piece of tile which can be used as a decorative item to either “finish” an edge of an installation or as a decorative “break” in between mosaics.
Mesh backing, usually made of fiberglass or a similar material. adhered to small tiles or pieces arranged in a pattern creating a mosaic sheet.
Decorative art form in which small pieces of materials, such as glass, arranged and affixed to a surface (i.e. paper-face, film-face, mesh) to create patterns or designs
Type of pattern that places tiles staggered row by row. Typical offset patterns are 50% staggered for products less than 12”, however larger tile sizes often use a 30% offset. (AKA "brick pattern".)
A method used to assemble and install mosaic tiles, where the tiles are temporarily adhered to a sheet of paper on the front or face. This technique helps maintain the desired layout and spacing of the tiles during the installation process, while allowing for flexibility to make adjustments prior to the adhesive setting.
A glass tile that is manufactured through a process where a method involves pressing molten glass into a single mold to form tiles, followed by cooling and finishing. These tiles are known for their clarity, uniformity, and strength.
Tiles set on mosaic sheets in a straight pattern, line after line. (AKA soldier pattern.)
Underlying surface onto which the tiles are installed. Choosing the right substrate is crucial for ensuring a durable and long-lasting tile installation. Substrate types include concrete, cement board, drywall, plywood, mortar bed. Substrates should be level and flat
A type of adhesive mortar specifically formulated for setting tiles. It is used to adhere tiles to various surfaces. Please refer to our installation guidelines for recommended installation materials including thinset.
A piece of tile that is used to “trim” edges or around corners. Such pieces include Quarter Rounds, V-Caps, Liners.
A cut using a water-jet cutting machine, which employs a high-pressure stream of water mixed with an abrasive substance to cut through various materials with precision. This method allows for intricate designs and shapes that are difficult to achieve with hand-cut process or traditional cutting tools.